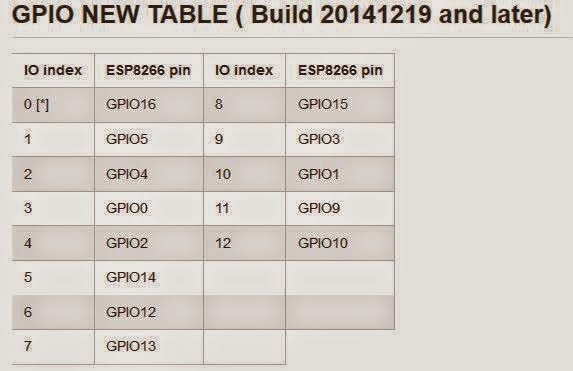
ต่อไปในบทความนี้จะอ่างอิงถึง IO Index 4 = PIN4
ก่อนที่เราจะใช้ GPIO เราต้องกำหนด Direction ก่อนว่าเราจะใช้ IO นั้นเป็น Input หรือ Output โดยการใช้คำสั่ง
gpio.mode()
Syntax
gpio.mode(pin, mode, pullup)
Parameters
pin: 0~12, IO index
mode: gpio.OUTPUT(สำหรับกำหนด OUTPUT) or gpio.INPUT (สำหรับกำหนด INPUT), or gpio.INT(interrupt mode) pullup: gpio.PULLUP or gpio.FLOAT, default: gpio.FLOAT.
mode: gpio.OUTPUT(สำหรับกำหนด OUTPUT) or gpio.INPUT (สำหรับกำหนด INPUT), or gpio.INT(interrupt mode) pullup: gpio.PULLUP or gpio.FLOAT, default: gpio.FLOAT.
Example
    -- set gpio 0 as output.
    gpio.mode(0, gpio.OUTPUT)
gpio.read()
Description
read pin value.
Syntax
gpio.read(pin)
Parameters
pin: 0~12, IO index
Returns
number:0 - low, 1 - high
Example
    -- read value of gpio 0.
    gpio.read(0)
-- read value of gpio 0.
gpio.read(0)
gpio.write()
Description
set pin value.
Syntax
gpio.write(pin)
Parameters
pin: 0~12, IO index
level: gpio.HIGH or gpio.LOW
level: gpio.HIGH or gpio.LOW
Returns
nil
Example
    -- set pin index 1 to GPIO mode, and set the pin to high.
    pin=4
    gpio.mode(pin, gpio.OUTPUT)
    gpio.write(pin, gpio.HIGH)
-- set pin index 1 to GPIO mode, and set the pin to high.
pin=4
gpio.mode(pin, gpio.OUTPUT)
gpio.write(pin, gpio.HIGH)
gpio.trig()
Description
set the interrupt callback function for pin.
Syntax
gpio.trig(pin, type, function(level))
Parameters
pin: 1~12, IO index, pin D0 does not support Interrupt.
type: "up", "down", "both", "low", "high", which represent rising edge, falling edge, both edge, low level, high level trig mode separately.
function(level): callback function when triggered. The gpio level is the param. Use previous callback function if undefined here.
type: "up", "down", "both", "low", "high", which represent rising edge, falling edge, both edge, low level, high level trig mode separately.
function(level): callback function when triggered. The gpio level is the param. Use previous callback function if undefined here.
Returns
nil
Example
    -- use pin 0 as the input pulse width counter
    pulse1 = 0
    du = 0
    gpio.mode(1,gpio.INT)
    function pin1cb(level)
     du = tmr.now() – pulse1
     print(du)
     pulse1 = tmr.now()
     if level == 1 then gpio.trig(1, "down ") else gpio.trig(1, "up ") end
    end
    gpio.trig(1, "down ",pin1cb)
Wiring
- RX -> TX
- TX -> RX
- CH_PD -> 3.3V
- GPIO 0 -> GND
- VCC -> 3.3V
- GND -> GND

ESP8266-01

Set IO Index 4 เป็น OUTPUT
pin = 4
gpio.mode(pin, gpio.OUTPUT)

หลังจากที่กำหนดแล้วเราก็สามารถกำหนด Logic เป็น 1 หรือ 0 ได้ นั่นก็คือการ On และ Off LED นั่นเอง
Logic 1 = On

Logic 0 = Off

หวังว่าคงจะมีประโยชน์ไม่มากก็น้อยน่ะครับ ^^
ไม่มีความคิดเห็น:
แสดงความคิดเห็น